Showing posts with label pattern. Show all posts

Friday, May 29, 2015

Sniff and Savor Collar Accessory (a new crochet pattern)

Bear, photographed by Shawn Phillipps

Our latest senior foster pup, Bear is adorable. I mean, who doesn't love that cute little face! And the furry paws! I adore him. Sometimes he needs a little help calming down. I'm not usually one for the fancy, frou frou world of essential oils, but they have really helped our other senior foster encounter new situations like getting petted, going to Petco, and meeting other dogs. 

So following in the line of my most popular pattern in Norway (hello Norwegians!) I analyzed a common household shape (a tube) and made it apply to a collar accessory that my other dog already owns, a Sniff-It. 

This FREE pattern uses a bit of needle felting as well as crochet, so kids, be careful around those felting needles! 


Friday, July 11, 2008

New Loom Knitter Circle! Kitchen Cooking Apron!

And my pattern is in it! Yea!!!!!

If anyone attempts it and struggles with the 3 needle bindoff imitation, I've created a video and put it on YouTube to help people with it.

Friday, June 20, 2008

The Anniversary Cowl


So this one has a good story behind it.

I had originally gotten this yarn from a swap partner who had no idea what to do with it. "Its slubby" she said, and "wool" so I can't use it, it "itches" and such.

So I boldly said I shall take it! And make it into something nice!

I tried it on my looms. It didn't look good. In fact, it looked so bad I rolled it back up again and stuck it in my stash.

It then went to a garage sale my mother had two years ago. Everyone looked at it - "too itchy" "too slubby" "too...something".

So it went back home to Illinois from the garage sale in Minnesota. Mind you, this yarn has went through three states of moving now from its home to me to the garage sale and back to me.

The colors were right for Relay for Life. Kind of a silver, a purple and a white, I thought to myself that this just might be something unique. It didn't feel that scratchy, now that I'm more used to what wool feels like. And it didn't look "that" bad.

I tried the "Peasy Scarf" pattern. Didn't work. I tried crocheting with it. Didn't work. I tried a drop stitch scarf pattern with it. Not quite it, either.

Then it hit me. I could knit it larger than suggested, to make something that would account for the largest slubs while accentuating the laciness of the smallest slubs. And now I have a pattern that works great for any unusual yarns, great for handspun, and it shows off every yarn to its greatest potential.

Monday, May 26, 2008

Much Less Frilly Moccasins

This pattern can now be found on Ravelry! Check out my latest post on the moccasins for more details.

Purple Flower Power!


You guys will probably see a flurry of posts from me in the next couple days as I try to make stuff to sell at the Relay for Life.

I know, I know, I got talked into another charitable thing. Again. With a tight deadline. Did I mention I know?

Anyway, this was an idea for something quick and fun and I think they should be a big hit with the kids!

Feel free to use them for your Relay for Life projects!

This project has two parts, the flower and the "chain". Here's what to do:

Creating the "Chain"

1. Slip knot (leave a nice bit of yarn free) and Chain 120.
2. Single crochet into the 2nd chain from the beginning, and each chain thereafter (118 sc)
3. Chain one, then turn, and Single Crochet into each Chain. (118 sc)
4. Slip stitch into each single crochet (118 slip stitches)
5. Fasten off, and make sure to leave a nice bit of tail.

Creating the "Flower"

1. Chain 6. (6)
2. Do 12 double crochets into the space (like doing a granny) (12)
3. Chain 3, and do 2 double crochets into each double crochet from row 2. (24)
4. Chain 4, and do four treble crochets into the first double crochet from row 3.
5. Single crochet into the next stitch, then chain 3 (so essentially you will have a single crochet with three chains on top of it).
6. Repeat rows 4 and 5 through the entire circle.
7. When you reach the last set of treble crochets, you should be back at the beginning with no space for a single crochet. This is okay! Do the single crochet in the stitch where you had started the treble crochets (they should scoot over just fine).
8. Then join the first treble crochet and the last single crochet with a slip stitch. Fasten off, and weave in your ends. Your flower is complete!

Creating The Necklace:
1. Take your "chain" and fold it in half. Make sure it lies flat against itself! Take the pesky beginning yarn tail (from the beg. chain) and thread it through a yarn needle.
2. Weave this through the back of the flower, preferably into the first set of double crochets nearest the center ring. DON'T CUT THE YARN!!!!!
3. Once that's completed, do the same for the tail from the other side of the "chain".
4. Now, while I mentioned "don't cut the yarn", I really mean "don't cut the yarn!" here, also!
5. Now, take the remaining tails and thread them through the other side of the yarn, and weave them in. NOW, you can cut the yarn, LOL! If you're much more adept with a sewing needle, you could use some new yarn, but I'd just as same use the same thread from before.

And there you have it, a cute little flower necklace, modeled here by my bear Groovy!

Sunday, May 25, 2008

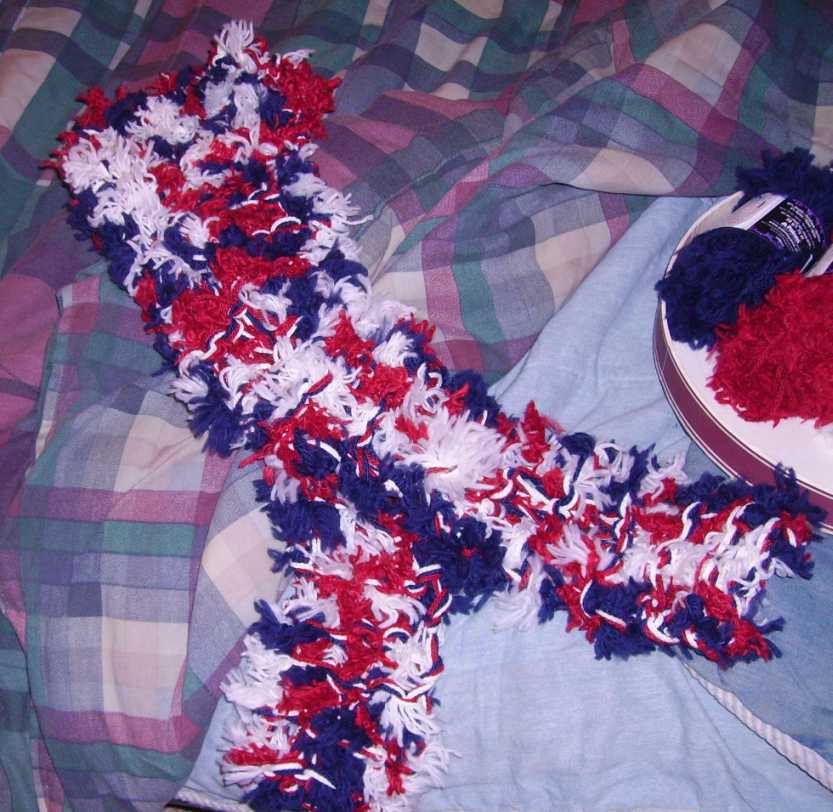
Relay Scarf


My newest pattern, created just for the Relay for Life of Berwyn Cicero.

I could REALLY use your help...if you can possibly donate your time or your dollars, here's where to go:

Concetta's Relay For Life Page

Anyway, to get the pattern, head over here:

Relay Scarf

Monday, February 18, 2008

Quack Here and There


Sometimes, I just have to get something done. Little guys like this are what come out of this feeling that irks you until something happens.

I was sitting at home staring at a pile of Red Heart Super Saver that had been donated to me via my aunt-in-law and my grandmother-in-law. Bright yellow, orange - very odd colors I wasn't sure what either of them could have thought to do with them!

Then it occurred to me - this was a baby duck in the making! With a beak to grow into and cute little wings, this was a great idea!

I thought about how much sewing I would have to do if I followed the pattern in my Crochet project deck and decided to make my own. This isn't so much a pattern as a description of how I did it, and you can judge for yourself if you like the idea - or not.

I started by chaining five and then gradually expanding out in a circle until I had a small bowl sized shape. I then started decreasing until I had a ball shape, but enough room to stuff - which is what I did then. I closed off the circle and then used that as the beginning of a "foundation" for the back of the neck. I single crocheted around in a circle, I believe five stitches, and after that was tall enough, I stuffed it and closed it off as well. I then took the string and pushed it through the inside back to the other ball and made fan wings - cast on eight stitches, treble crochet into the fourth stitch eight times, slip stitch into eighth stitch - and then stuck the yarn through and did the same thing on the other side.

I then took some orange yarn and did fans for the feet and looped them through the bottom of the yellow ball - these were only four tc's instead of 8. Last, I did the beak, in which I kept doing single crochets until I got the shape I wanted. Then of course, I had to do eyes, which became simple French knots.

So a cute little duckie was born, and he lives on my tv now.

Sunday, January 20, 2008

Sketching, and searching!


I found it...here's one of the reject patterns, since I know my partner might see it.

I love it when you go through book after book after book, only to find that the real pattern that you are looking for will just "pop" out at you as this sudden realization like you've been searching for it your entire life! I love that feeling!

So now its off to yarn choice. I got one at the store today, but the gauge is wrong. Have to try again tomorrow at IDEA Studio or at the HL. I'm thinking I have the right color for one but not the other. And its a bugger to find - I've been searching all over the Interwebs to find it. I may have to ask my dear friend to work some muggle magic over the local YS owners to track something down in the right color.

Wednesday, December 5, 2007

Voodoo Scarves

Anywho, I've been busy knitting away since meeting the Berwyn Knitting Guild (now the Berwyn Knitting and Crochet Guild).

I started doing some stash busting because I want new yarn, damn it!

This is a super easy design and though my husband thinks these scarves look like Swiffer pads, I actually think they're kind of cute. If I didn't have so many I wouldn't be donating them to charity.

That's right - I went to a Jaycee meeting. And found out about the winter gear drive. And decided I'd do some stash busting and knit some stuff to donate, plus get rid of some of my older creations that I don't necessarily want to keep around because I want the chance to design new stuff.

So here's the Voodoo Scarf pattern, without further ado:


Supplies:
US Size 50 knitting needles (aka "Speed Stix" or 25.00 mm needles)
6 skeins of Patons Voodoo

Directions:

Take three skeins of Patons Voodoo and holding as one, cast on five stitches.

Knit garter stitch until complete. A typical adult sized scarf will be about 2 skeins long, because they make these ones darn skinny. Good thing that they were at the Dollar Tree.

Tuesday, September 25, 2007

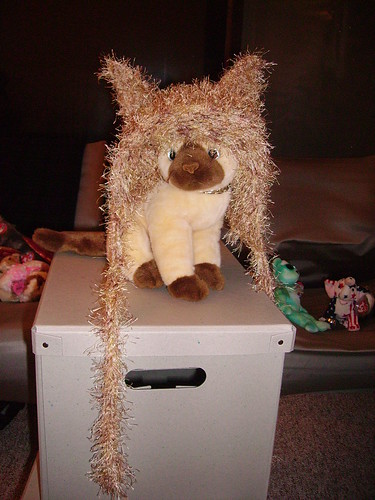
The Kitty Kat Hat


The Kitty Cat Hat!

Someone asked if it was doable on the loom, and here it is!

Base Pattern: Ro's Earflap Hat

Modifications:
-Used maybe 1/4 skein of Mainstays yarn and 1.5 skeins of "knitting" fun fur in tan.
-Added ears.

New Pattern:

Ears:

Cast 6 pegs onto a green Knifty Knitter. Do 4 rows back and forth.

Here's where it gets a bit tricky:
E-wrap peg 6 (go from left to right, leftmost peg is 1 and rightmost is peg 6) and knit off. Move the loop on peg 6 to peg 5. Ewrap and knit off all pegs back to peg 1. Do another row of e-wrap (pegs 1-5).

Continue this process until you have two pegs left with loops on them. E-wrap two rows, move the loop on peg 2 to peg 1, knit off. E-wrap peg one again and knit off. Send the yarn through the loop and knot off.

Repeat this process 4 times to make 4 "ears".

Take a pair of ears and whipstitch together the sides NOT the bottom. Repeat for the other pair of ears.

Lastly, whipstitch the bottoms of the ears to the hat. I recommend doing it on each side so the ears remain stiffly out.
---
The ears are way customizable: for a rounder ear, halve the amount of ewrap rows at the beginning and end. for a more even triangular ear, do continuous decreasing rows instead of an e-wrap row in between. do an inside and an outside ear pair - pink on the inside first ear, fur on the outside second ear.

This hat fit me even with a large head, so feel free to customize it!

Oh, and I mustn't forget to credit my model, Siam the cat.